Flipping a Lesson is as easy as 1-2-3: Three tools for your first screencast

In this post, I want to share how you can flip your first lesson by using three (totally free) online resources.  Before we move any further, I would like to add a disclaimer.  This three step process should be followed only if you have prepared a lesson to be recorded.  This is not a shortcut and not the only way to record your lessons, but it is one of the easiest processes if you want to get started right away.  If you’d like to learn more about flipping your first lesson, you can check out this post:

Flipped Learning:  The Four Stages of Flipped Learning

Here are the three online tech resources you will need to complete your first flip:

  1. Google Slides
  2. ScreenCastify Chrome Extension
  3. EdPuzzle

You can click on any of the above resources to sign-up and/or install the resource.

Once you are familiar with the four stages of flipped learning, you can move forward and begin the process.

slides-small

Step 1 – Create your lesson in Google Slides

Before we begin recording, we actually need some content on screen if you are using the google slides method to convey your topic or objective.  This is especially nice for History, Science, English and any other teachers who have a great deal of straight information that the students need to understand.  Some of my colleagues who have flipped their lessons and take this 3-step approach, use PowerPoint presentations and just upload them to google drive.

Helpful Hint: You want to shoot for your video to be no greater than 10 minutes in length, so if you content is rather long you can just start to chunk your lesson.  Give it to your students in increments that are easily digestible.

If you are a math teacher, you know that sometimes putting your content into slides is rather challenging.  It can be done, but just know that it may take you longer to reveal each step in your slideshow.

Once you have your content ready to go, it is time to finally start recording!

chrome_promo_marquee

Step 2 – Recording your first lesson!

For a step by step guide to setting up and using the screencastify chrome extension, follow this link to a previous post I made on this resource.

How to Install and Use the ScreenCastify Chrome Extension

Helpful Hint:  Remember to be yourself when you are going through your screencast.  Adding in your own personality helps students stay intrigued in the lesson and are more likely inclined to pay attention.  Also, try to add in some singing, dancing, humor, etc.  Anything to catch their attention can be extremely helpful!

edpuzzle

Step 3 – Your video is done and you are ready to use it! EdPuzzle can help!

EdPuzzle is a flipper’s dream come true!  The most frequent question I receive when I am out at my conferences presenting is

“How do you know if your students watched the video?” 

Good faith, right? Sorry to bring you some bad news, but your students aren’t 100% straight with you all the time…

Shocker!

What EdPuzzle provides, is an interactive way for you to manage your video lesson content.  When you post a video for your students to watch, you can immediately see who watched, for how long, and even post questions for your students to answer during the video!  It is a valuable resource for any flipped classroom and I have made it pretty easy to get started.

If you head over to my youtube page, I have provided two tutorials on EdPuzzle for you to get started.  Check them out by going to the following two links:

  1. EdPuzzle Intro – https://youtu.be/LirzJIexkgs?list=PLWpRB_Km3JorOcjtI-EjBl6Nb9Ndg0Y14 
  2. EdPuzzle Classes and More – https://youtu.be/4LEHIusZdCw?list=PLWpRB_Km3JorOcjtI-EjBl6Nb9Ndg0Y14 

Make sure to check them out and if you have any questions, just let me know!

There you have it!  Flipping your first lesson can be as easy as 1…2…3!  There are many different ways in which you can record and deliver your content, but this is an easy process to follow for any beginner.

Good luck in your flipping adventures and always feel free to contact me!
Grammarly: Keeping the world a little more intelligible everyday!

One of my biggest concerns, when I am constantly sending out newsletters or emails home to parents or to other colleagues, is that I am going to make a grammar mistake or spelling mistake in my message.  It sends a message of unprofessionalism when we mistakenly use the word “there” instead of “their” or make any other common mistake.

After all, we are well-educated teachers aren’t we?

Nevertheless, there are often times when we are in a haste when writing something and the moment we hit the send button we see the mistake, but it is too late.

What if there was something that could check my grammar and spelling automatically no matter where I was on my computer?

There is and it is called Grammarly.

grammarly-logo

Grammarly is a writing-enhancement platform developed by Grammarly, Inc., and launched in 2009. Grammarly’s proofreading and plagiarism-detection capabilities check for a writer’s adherence to more than 250 grammar rules.

This is a powerful program that is accessible and usable across all platforms.

You can think of it as spellchecker on steroids and is very intuitive to use.

In addition, there are two ways that you can utilize the Grammarly service.  The first, is by going to their website, www.grammarly.com, and downloading their program to your computer.  This will allow you to spell and grammar check everything that you are working with whether it is a word document, PowerPoint or any other program.

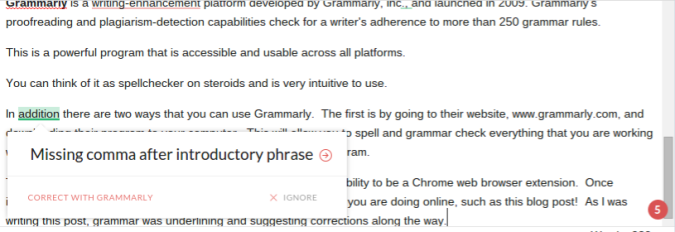
The second way, which I think to be really neat and useful, is its ability to be a Chrome web browser extension.  Once installed, Grammarly Chrome Extension will check everything that you are doing online, such as this blog post!  As I was writing this post, grammar was underlining and suggesting corrections along the way.

Here you will find a couple of screenshots where you can see Grammarly in action:

Screenshot 2015-06-18 at 12.28.13 PM

  Screenshot 2015-06-18 at 12.28.07 PM

Grammarly will offer you suggestions for your spelling mistakes and correct your grammar mistakes for you.

This is a great tool to use on a regular basis to make sure you are communicating effectively and efficiently.

Go try out Grammarly and I’m sure you will love it!

How to install and use the Screencastify Chrome Extension!

If you have attended any one of my sessions on flipped learning this year, you will probably remember me talking about a chrome extension called Screencastify.  This neat little chrome extension allows you to capture everything you are doing on your screen and can come in handy for when you want to record a video lesson for your students or have your students record a video lesson of their own.  It is also 100% free and easy to use on any operating system since it is through the chrome browser.

In this post, I want to walk through the process of installing the chrome extension and then using the features it offers!

Note: You will have to download the chrome web browser if you don’t already have it installed.  HERE is the link if you would like to download chrome.

Part 1 – Installing the Screencastify Chrome Extension

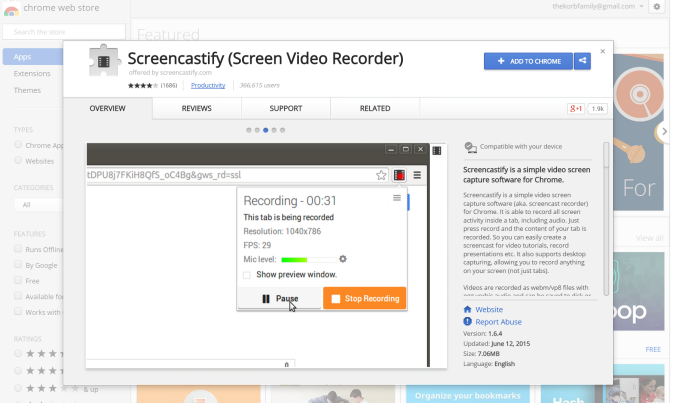
You will need to head over to the Chrome Web Store or simply follow this link to the Screencastify Extension.

Extension Install Screenshot

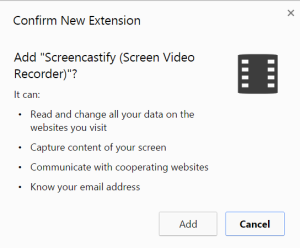
Click on the +ADD TO CHROME button and the application will pop-up with the following window asking if you would like to confirm the new extension.

Confirm New Extension

Press Add and it will install the extension into your browser.

Installed

Once the black film strip has appeared in the top of your chrome browser, you have successfully installed Screencastify!

Part 2 – Using the Screencastify Chrome Extension

This is where there are a bunch of different paths you can take with multiple settings, so I will briefly talk about each option and then leave it up to you how you want to record.

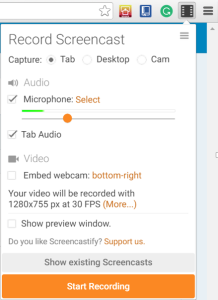
When you are ready to record a screencast, it is relatively easy to get started.  You will need to click on the newly installed black film strip icon that is in the top right-hand corner of your browser, which will open up this window:

Options for Screencasting

Here is a breakdown of the options to select:

The first section is labeled Capture and this option allows you to record three different ways.  The first way and the second way are very similar but have one major difference.  If you choose the Tab setting, the only thing that will be recorded is what is on that tab of the browser.  However, if you choose Desktop, you will have the ability to record everything that is going on within your computer screen. This is the setting that I choose most often because I like to switch between various resources during my lesson.  Lastly, the Cam option is exactly what it sounds like – the Web Cam on your computer.  You would choose this setting if you would like to visually record something that is going on or just you yourself on screen.

Next, you will want to make sure that the Microphone button is checked and the correct microphone is selected if you happen to have a nicer recording device you are using.

If you would like to have the audio of the tab you are on playing during your screencast, then make sure to check the box labeled Tab Audio.

The next set of settings deals with video capturing and displaying.  If you want to embed your webcam, which is when a video of yourself is displayed in one of the corners of your screencast during recording, then you would want to choose the location and check the box marked Embed Webcam.

The last setting won’t actually be seen by anyone but you.  If you would like to see what your audience would see during your recording, then click on the Show Preview Window checkbox.

Congratulations, you are now ready to start recording!

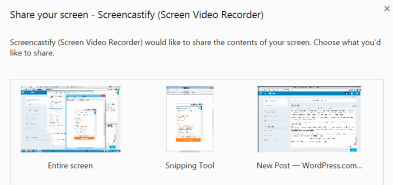
Click on the Start Recording button and the next screen may or may not pop up depending if your chose desktop or not.

Capture5

If it does, then just click on the Entire Screen option and press Share.

Now you should see that your Screencastify icon changed to this image:

Capture6

This shows you that you are recording and anything that you are doing is being recorded.

When you are ready to stop, just simply click on the icon and select the button marked Stop Recording.

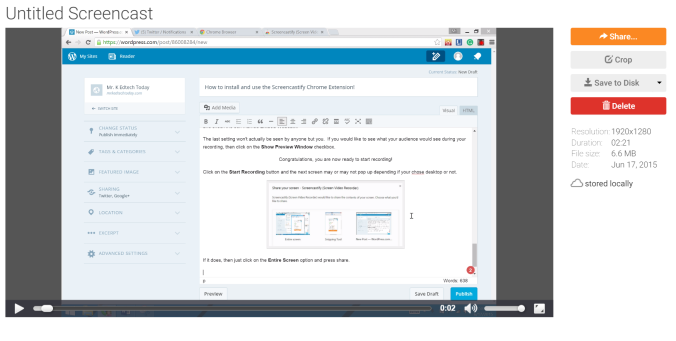
Screencastify will bring you to their website with your screencast.

Capture7

You now have the options to share your video with YouTube or Google Drive, Crop the video, save it to your harddrive, or simply delete.

That is a comprehensive look at the process of using and installing screencastify!  Enjoy!

P.S. Here is a LINK to a screencast of screencastify that I did during my conference today.

Flipped Learning: The 4 Stages of Flipped Learning

In preparing for the Core Connections Conference in Reading, PA this morning, I thought I would write a blog post that is directly out of my one workshops today called “Flipping Your First Lesson”.  In this session, attendees will gain a general set of tips, tricks and resources to “flip” their first lesson.

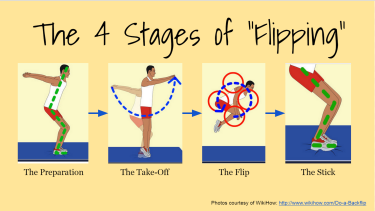
What I like to relate the flipped learning model to is the actual act of doing a backflip!  A special thank you to wikiHow for their nice step-by-step instructions on how to perform a physical backflip.

I created the following image to better represent the 4 main parts of the Flipped Lesson process.

CaptureBefore we get too far into the process, I would like you to contemplate these questions:

  • Why do you want to flip?
  • What do you hope to achieve?
  • What are your goals?
  • How much time are you willing to invest?
  • When will you start?

These are all very important things to consider when preparing to flip any lesson.  If your motives are in the wrong place or your motivation is lacking, then it will be reflected in your video creation.  This is why we have the first step in the “flipping” process that is called The Preparation.

You know the old saying “Practice Makes Perfect” and that goes for flipping your classroom as well.  You need to follow the 3 Ps of preparation:

1) Plan  2) Plan  3) Plan

This seems pretty straight forward, but the planning stages of your lesson are the most crucial.  This is the time in which you are carefully choosing the topic that you want to record.  At this stage, you are creating a script and getting the necessary examples and notes ready for your big casting call!  There are so many aspect that go into the planning and preparation step, but it is essential if you want to have a clear and attention-getting message sent out to your students.

One last question, before we move on, is to ask yourself if you are using your flipped lesson to enhance or replace your lesson.  There is a significant difference here in the fact that when you replace something, you are not increasing academic interaction. When you enhance a lesson, you are adding a digital boost to your current topic. Always strive to enhance your lessons and not simply just replace them.

Moving on, the next two stages of the flipping process go hand in hand.  The Take-off and The Flip are oftentimes connected and run right into one another.  The Take-Off or the Launch is the starting access point for your students.  At this point you have recorded, edited, and hosted your video to a platform of your choosing.  You are now ready to give the viewing assignment to your students.

Helpful Hint:  Give your students a 2-3 day turnaround viewing time.  This allows for no excuses on their part, because if you assign a video to be watched by the next day, you would be surprised how many students had their computer explode or that the internet broke.  I have heard quite a few clever lines!  🙂

The Flip is something you have little control over and that is a good thing!  It is now in the hands of your students and it is up to them to hold up their end of the deal.  In a later post, I will elaborate more on how to handle frequent “non-watchers”.

The last stage in the sequence is The Stick.  Did the concepts “stick” in your students’ minds or was it in one ear and out the other?  This is the most crucial step in the process.  Make sure to always check for understanding, because if you do not, then there is little or no accountability for your students to actually watch the video.  Here are a few ways to do that:

  • Give them guided notes they must fill out during the video
  • Give them a quiz when they enter into class
  • Have them take a screenshot when the are at certain times in the video(they find this funny and love it!)
  • Have them respond to a few reflection questions after viewing
  • Discuss the concepts as soon as they arrive for class
  • Have them record a video in response (tried this twice and got some good results)
  • Use a Classroom Management System to do this work for you! (EdPuzzle is a great solution)

I hope that this has been helpful for those of you new flippers out there and remember to follow the 4 stages of flipping implementation to ensure a successful flip.  Start with The Preparation and be sure to plan, plan and plan.  Next, record your video and then Launch!  Trust your students and give them the responsibility to complete The Flip. Lastly, make sure to check for understanding and Stick the landing!

Enjoy and remember…

“When the going gets tough, the flippers keep flipping!” @mrjkorb

See you next time!

Awesome QR Collaboration Activity for Conditionals

Today in class I had my students rotating through a series of 6 stations.

Yes I said 6… and no there is nothing wrong with me!  

They were all very short and concise review activities for the upcoming geometry test this Friday on Logic and Reasoning.

Always a favorite among my students…okay I may be stretching the truth a little bit!

One station in particular was called QR COLLABORTATION STATION and is exactly the way it sounds. Each group was given different QR Code that took their group to an editable Google document for them to share and work together on.

Here is the only paper that I had at the station:

CaptureEach team had a different version of the online document, so they weren’t editing other teams’ work.

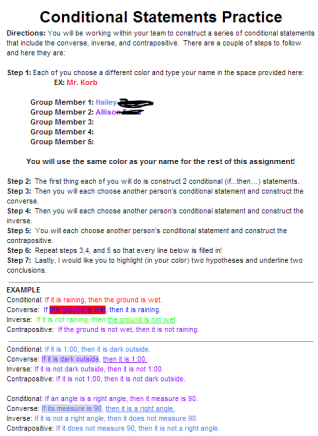
This is the assignment that they were to complete.  It required them to use their prior knowledge to write a conditional statement, the converse, the inverse, and the contrapositive.

CaptureThey all did really well and were really engaged throughout the entire lesson.  They asked questions, helped each other out and worked hard.

Here is the link to a copy of this document if you would like to use it in your class!

QR Collaboration Activity:  Conditional Statements

Have fun and enjoy!

Mr. K

The New Age of PD:  Teach me like I teach my students!  

Differentiate.  Collaborate.  Individualize.  Innovate.

These are the words that we hear at every professional event, conference, and/or faculty meeting we attend and it is all directed to how we can accomplish the above for our students in our classroom, but what about us?

Why are staff members still subject to the same old inservice days of the past? 

Why are we sitting through a two or three hour presentation on how we should be teaching, when we would never dare subject our students to such cruel and unusual punishment?

Why are we not individualizing and differentiating our Professional Development through collaboration and innovation? 

These are the questions that are slowly being answered by school districts across the United States.  Fortunately it is just a matter of time until individual PD is a part of the regular routine, but like most changes they take time.

In this post, I would like to stretch the bounds of “normal” PD and create PD that is individualized and different for everyone!

1) We are not sugar cookies, so stop using “cookie-cutter” PD!

Like I said before, for we as teachers to come together and say there is only way in which we all will learn the best is totally absurd and we all would need our heads examined.  We are no different from our students when it comes to the learning process!

SPOILER ALERT!!! 

 Nobody looks forward to sitting in an auditorium for 2 1/2 hours while listening to someone who left teaching years ago and is now making money telling you what you should or should not be doing. For starters, it’s not relevant and secondly we are each at a different place and each have our own individual teaching styles.

2) Give us time to collaborate and innovate!

The most beneficial professional Developement I’ve had this year is every time the “hybrid” team teachers get together. For about 3 hours, all we do is talk, collaborate, and bounce ideas off of one another. It has been during these times that we have grown the most and have been able to successfully incorporate something new. It’s the excitement of one teacher talking to the rest that drives the conversations and professional development! Every single member of our team would agree that those times that we have met have never been a waste of our time or efforts. Everyone goes away with at least something new to try, but more importantly the confidence and tools to do so.

3) USE TECHNOLOGY!!!

Our school has implemented a 1-to-World program in which every student has a Google Chromebook, but guess who also has a computer?

WE DO, SO USE THEM!

We are continually getting training on how to individualize our instruction for our students, so why can’t our PD be the same?

4) Be Flexible!

The last portion to consider is a flexible professional development. We cannot expect ourselves to truly be engaged and innovative if we are set to a strict schedule. Again I’m going to use the phrase “imagine if you are in a classroom.” My lessons change on a daily basis because of the different students that I have.  Even the greatest teacher cannot predict with a hundred percent certainty that a lesson will last X amount of minutes and then everyone will understand the topic.

Education does not work that way!

I believe that one of the job requirements of a teacher is to be flexible because you have no idea how a day will turnout until it is over.

Therefore, it is almost implied that professional development should be run the same.

In conclusion, I would love to see professional development evolve into something new and even more effective!

Professional Development should…

  • …be individualized.

  • …be differentiated.

  • …include collaboration time.

  • …incorporate technology.

  • …be flexible.

I believe if we can include the above points into our PD Sessions, we can achieve a higher level of success, productivity and innovation!

Let’s Kahoot.it Up!

When it comes to student response systems, there are a plethora of different platforms from which to choose.

The one that has been dominating our high school recently and is the requested choice from all of the students is a website called Kahoot.

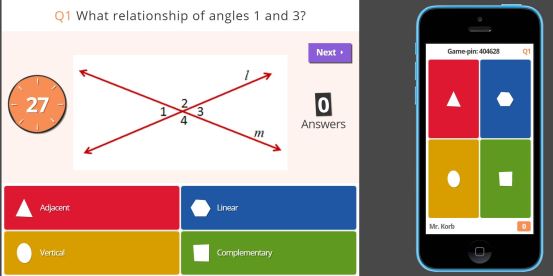
The Kahoot platform is built around multiple choice, quick response questions in which the question is displayed on the main screen and students respond via computer, tablet or smart phone.

WARNING!  STUDENTS WILL BECOME EXTREMELY COMPETITIVE DURING GAME PLAY!  USE CAUTION!

The reason students love Kahoot so much is pretty simple. It is the competitive edge that is added to the game that makes it so addicting and exhilarating. The faster you answer the question correctly, the more Kahoot points you receive!  My students get fired up if they are not on top, which adds to the excitement of the class.  There is nothing wrong with a little healthy competition!

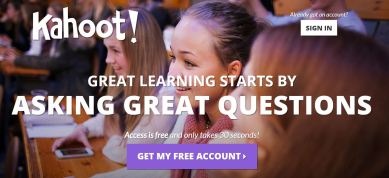
Capture

Kahoot is totally free to use and you can create an account and get started in a matter of minutes!

Here’s how:

STEP 1:  Head over to www.getkahoot.com (one of the two websites that you will need to rock and roll) and click on the “GET MY FREE ACCOUNT” button.

STEP 2:  Set up your account using a valid email address and you will be taken to your dashboard.

Capture2

STEP 3: Start using Kahoot by…

  1. Creating a Kahoot Quiz, Discussion, or Survey!
  2. Searching for Public Kahoots that are already made and ready to go!
  3. Retrieve a Kahoot that you have already created!

If you visit my YouTube Channel, I will soon be posting a tutorial video on how to create/manage quizzes.

I mentioned earlier that you needed two websites in order to play Kahoot.  The first link that I shared is the link that you as a teacher will need in order to manage the quiz and project it for your students to actually see the questions.  The second link you will need (or rather your students will need) is in the title of this article:  kahoot.it 

Here is a screenshot of what you and your students will see during game play:

Capture3Kahoot is a very powerful and fun formative assessment tool to use in any classroom, so don’t be afraid to try something new and remember to kahoot.it up!

EdPuzzle: Essential Tool for Hybrid/Flipped Learning

Question:  What is one of the hardest things to monitor in a hybrid or flipped classroom?

Answer:  Whether or not your students have watched the videos you posted!

At a recent conference, I spoke on my experiences with flipped learning. When I took questions at the end the number one question that was asked was “how do you know if your students watched your videos?”

Good faith, right?!

Wrong. Although we would like to think that we all teach little model students that always do their homework and complete every activity you may assign with diligence and rigor, reality tells us otherwise.

Before finding a wonderful little tool known as EdPuzzle, the way in which I would check to see if my students watched the video would be by them doing three things:

  1. Complete guided notes during the video.
  2. Answer questions via a Google Form
  3. Have a quick check quiz the moment the stepped into the door the next day.

Although this may sound pretty solid, the problem is that students could easily skip the video and fudge their way through the online quiz.  However, almost always I would have students fail the quick check quiz because they didn’t know anything and I would be back at square one and have to teach the whole thing anyway!

Wasted time is something we can’t afford!

Now let’s get to the saving grace!

EdPuzzle is a totally free online tool that allows teachers to create and mange classrooms and provide them a way to monitor and track student progress.

There are a couple of key features that make EdPuzzle stand out against the rest:

Use your own content or any video on the web.

One of the amazing features of EdPuzzle is the ability to upload your own self-created videos or use any of the tens of millions of videos already on the web!  You can choose videos from top video hosting platforms including YouTube, TeacherTube, Learnzillion, Khan Academy, and many more.

No video skipping…muahahaha! (Insert Maniacal Laughter)

The first time I used this wonderful feature of EdPuzzle I did not inform my students on their inability to skip ahead in the video clip.  I just sat back and watched them as they began to realize what I had done.

One by one the frustration of not being able to fast forward the video became apparent.  Once that initial phase past, they got over it and began to watch the video the way I wanted them to originally.

In addition to the inability to fast forward, they are also unable to minimize the page or open a new one without pausing the video!  Props to EdPuzzle for thinking of everything!

Questions please!

One of the most powerful parts of this saving grace is the ability to place quick check questions throughout the video to check for student understanding. When it is time for a question, EdPuzzle will pause the video and a question will pop up that the students must answer to continue the video. This forces students to be actively engaged in the lesson instead of being passive learners.

Those are just three of the many ways in which EdPuzzle is a great and effective tool to use with your digital learners.

If you would like to learn more about how to get started using EdPuzzle, click on the links below to be taken to my YouTube Channel.

Tech Tool: EdPuzzle (Intro)

Tech Tool: EdPuzzle (creating classes and videos)

Thanks for reading!

3 Ways to Promote Student Engagement with QR Codes

“Those look cool…but what are they?”

That was a comment/question I received from a fellow colleague one day when they walked into my room and saw them hanging on the walls and strewn about the desks.

After telling them all about what QR Codes are and how to make them using a website like www.qrstuff.com or www.the-qrcode-gererator.com, I received this response.

“QR Codes are cool…but what can I do with them?”

When introducing anything edtech related to someone who hasn’t used it before, it is similar to “pitching” a new product.  You want them to want to use it, so I began to try to answer the “tech”-age old question:

“How do I use this in my classroom?”

With that in mind, here are three ways to incorporate QR Codes into your next lesson effectively and grow your students’ self-motivated interdependence and engagement.

1) QR Code Answer Key

Say that you are working in stations and you can’t be every place at once, so what do you do for those students who need to check their answers?  Instead of just handing them the key, say to them that once they are finished they can come up to your desk and retrieve the QR Code Answer Key for their station.  There are a few of you who are probably thinking that I am just replacing a physical paper copy with a digital copy, so there is nothing new about this activity.  It is just a replacement.

You’re right!  This does not a game changer when it comes to innovation, but it is a simple activity that prevents extra copies of the answer key just lying around.  Having them stored digitally allows for you to make changes and modifications to the assignment at any time, while maintaining a single location for the digital copy.  A second benefit is exactly what was stated before.  There is no need to paper consumption when it comes to an answer key, thus taking you one step closer to a paperless classroom!  (okay, maybe that last one was a stretch…)

2) QR Code Scavenger Hunt

If you are a first time user of QR Codes in your classroom, you will find that your students will be excited about the new technology for the first day or two, but if you don’t mix things up, become creative, and step up your game your students will quickly dread the QR Codes if all you do is digital worksheets.

To prevent this “bad taste” from occurring, begin to mix up the types of activities that your students complete.  I like to call this one a scavenger hunt because they don’t know what they are going to have to do next in the series of QR Codes and the only way to find out is by scanning away!

This is a great time to pull in some of the other edtech tools that you may feel comfortable with and incorporate them into the scanning-palooza that is going on.  Throw in videos, podcasts and even actions that your students have to complete that tie into the topic that you are studying.  Even send them on a little mini-webquest by posing a question at one of the QR locations is a simple, yet powerful way to test your students’ knowledge.

Students will have a blast with this activity, especially if the activities are varied because they will have no clue what is coming next!

3) QR Code Homework Help

How many times have your heard from a student when they walk into class without their homework complete “I didn’t understand how to do the assignment, so I didn’t complete it”?  This last example of using QR Codes is one of my favorite QR Activities and I include it in almost every unit that we cover.  This one does take some time to pre-plan and prepare, but I promise it will be well worth the effort!

When students get home and sit down to do their homework, they might have remembered 10-15% of what was in class that day, so homework can become a constant struggle.  How awesome would it be if your teacher could recap a certain topic for you? Sort of like your own little one-on-one time with the teacher!

GUESS WHAT?!  WE CAN DO THAT!

I record myself talking about each specific section of the homework, generate a qr code, and paste it directly next to the directions on the worksheet!  My explanations or recap of the lesson is not long (maybe a minute or two), but it is just enough to get my students jump started on the problems at hand.

I have seen a dramatic increase in homework completion and a significant decrease in homework questions.  I know that this seems like a lot of work, but trust me when I say that it is well worth it!

This is just a few ways to use QR Codes in your classroom and I would be eager to find out how you use it in yours, so leave a comment with a way in which you have used QR Codes to boost student learning!